
How Trim Works
A plain-language guide to the pieces that finish a room: what each one is called, what it does, and why it's installed the way it is. Every photo on this page is our own work.
Baseboard and shoe molding
Select a label to see what each piece is.
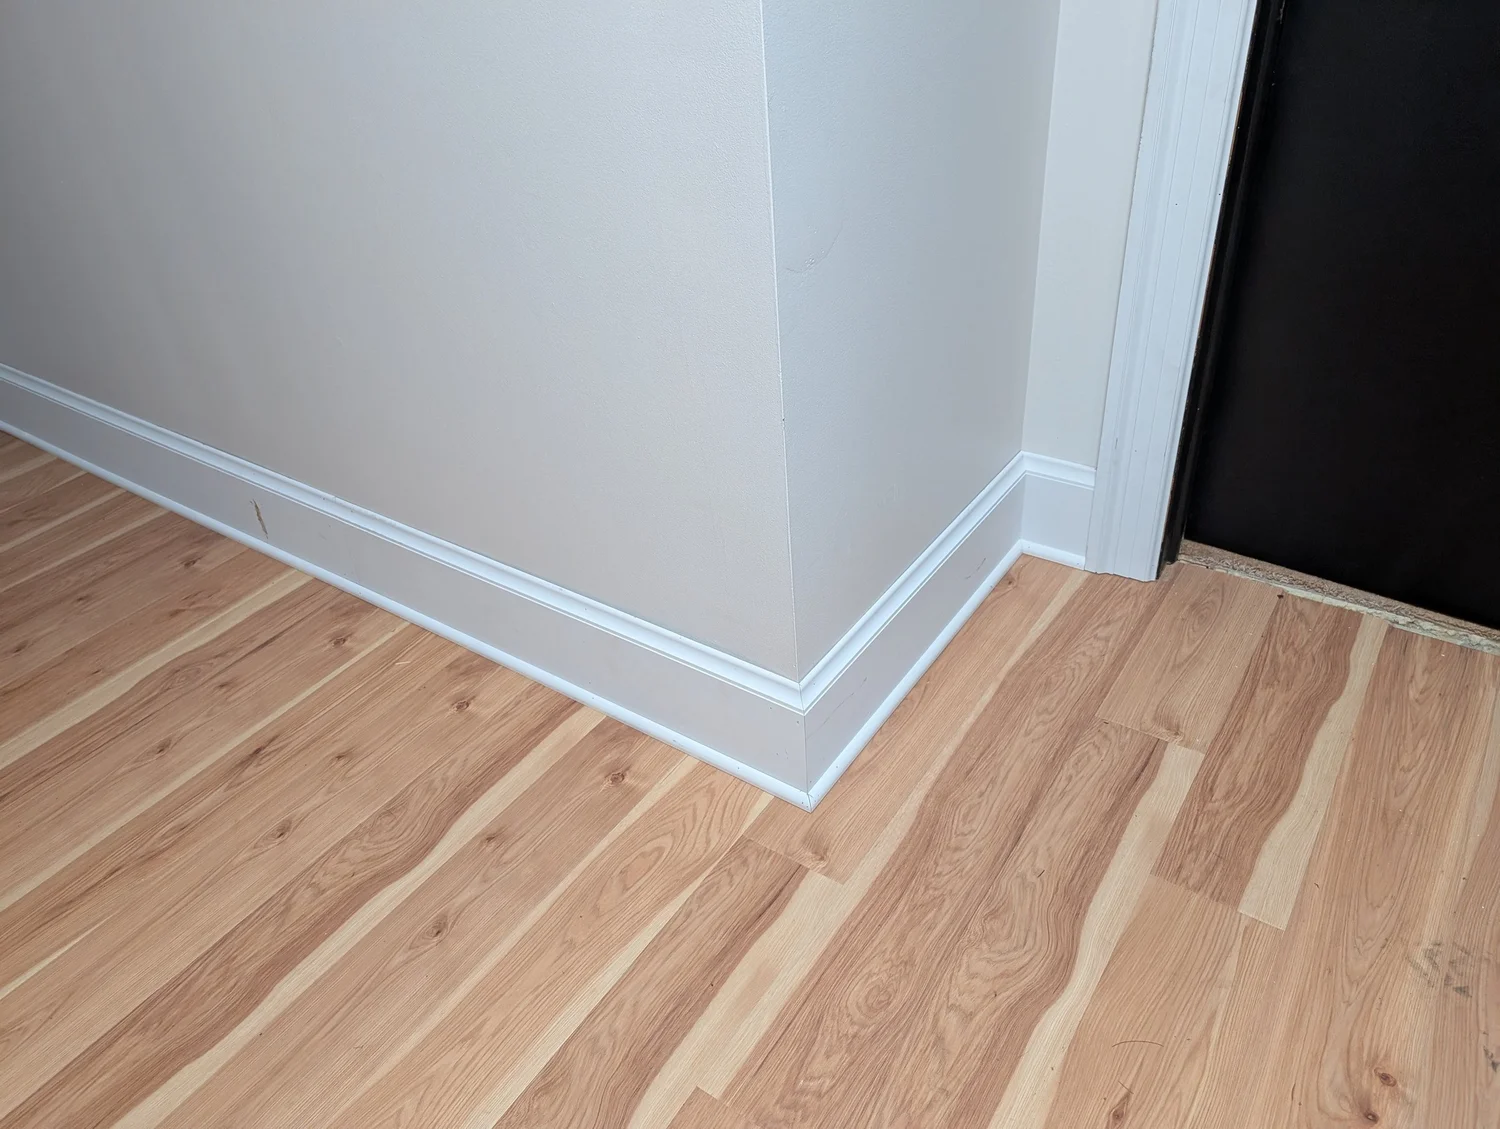
- 1Baseboard
Covers the joint between the wall and the floor and protects the bottom of the wall.
- 2Shoe molding
The thin strip along the bottom of the baseboard. It bends to follow the floor and covers the gap flooring needs at the walls.
- 3Outside corner
Where the wall turns outward, the baseboard and shoe are mitered so the corner wraps cleanly.
- 4Inside corner
Where the wall turns inward, the pieces meet tight in the corner.
- 5Base meets casing
The baseboard and shoe stop against the side of the door casing. The casing stands out farther than the baseboard, so the ends look finished.
- 6Door casing
The trim around the door opening.
Why shoe molding is there
Floors are never perfectly flat. Wood and laminate floors are also laid with a gap at the walls so they can expand and contract.
Baseboard is stiff, so it can't follow every dip in the floor. Shoe molding is thin enough to bend down to the floor, so it covers both the expansion gap and any small gaps under the baseboard.
Why shoe molding changes the door casing
Baseboard and shoe both stop against the side of the door casing. For that to look right, the casing has to stand out from the wall farther than the baseboard and shoe together.
The casing is thicker than the baseboard and shoe combined, so both end cleanly against it.
With a thin casing, the shoe sticks out past the trim and its cut end shows.
That's why adding shoe molding to a job can change which door casing you need.
If you'd rather keep your existing door trim, we can return-cut the shoe instead. The end of the shoe is cut and returned into the casing instead of ending in a raw cut. The photo below shows a shoe returned into the casing so it doesn't stick out past the door trim.
Shoe molding returned into the casing
Select a label to see what each piece is.
- 1Door casing
The trim running up the side of the door opening.
- 2Baseboard
Runs along the wall and stops against the door casing.
- 3Shoe molding
The thin strip along the bottom of the baseboard.
- 4Shoe return
Where the shoe meets the door casing, its end is cut and returned into the casing, so it finishes cleanly without sticking out past the door trim.
Door casing, jamb and reveal
Select a label to see what each piece is.
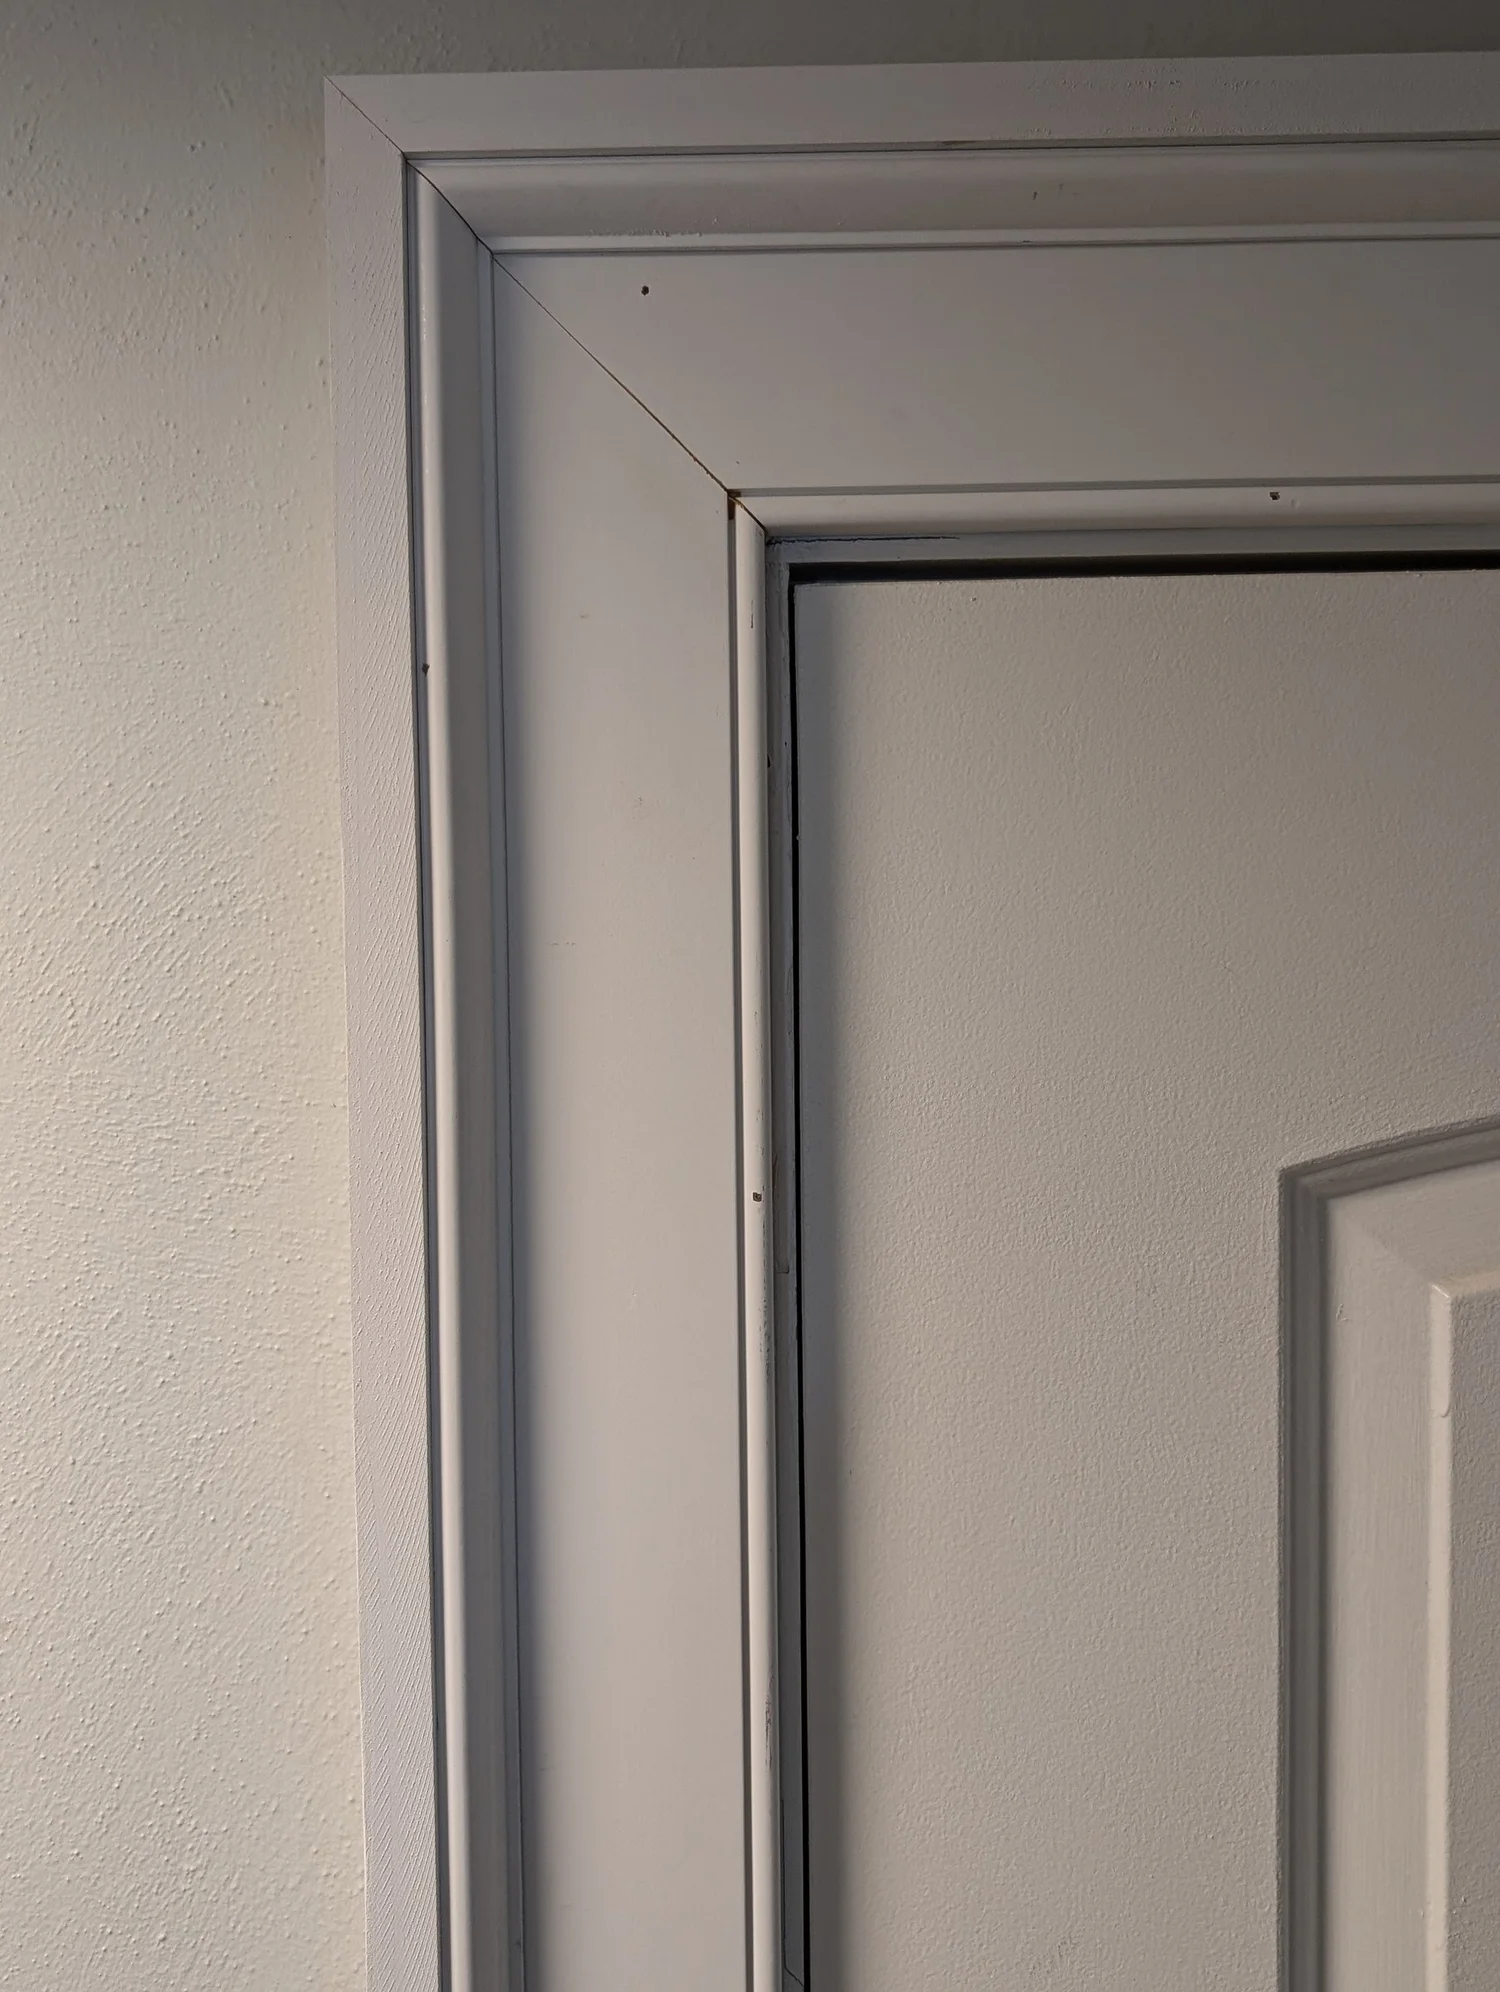
- 1Head casing
The top piece of the door trim.
- 2Miter
The head casing and side casing are cut at 45 degrees and joined at the corner, like a picture frame.
- 3Side casing
The vertical trim on each side of the door, also called the legs.
- 4Reveal
The small, even step where the casing sits back from the edge of the jamb. A consistent reveal makes the trim look straight and hides small irregularities in the jamb.
- 5Jamb and stop
The jamb is the frame the door hangs in. The stop is the narrow strip the door closes against.
- 6Door
The door itself, which hangs in the jamb.
The parts of a door header
Select a label to see what each piece is.
- 1Header cap
The top piece, here a crown-style cap that overhangs the header.
- 2Header
The wide board across the top of the opening.
- 3Header stop
A thin strip under the header that steps out slightly past the legs.
- 4Leg
The side casings that run down to the floor. These are fluted.
A mitered casing is one frame of the same molding all the way around. A built-up header is made from separate pieces stacked on top of the side casings: a header stop, the header and a header cap.
Each layer steps out a little past the one below, which creates the shadow lines that give a header its look. You may hear these pieces called by other names, and there's no single right way to build a header. We'll go over the style you want before we build it.
Three ways to trim a window
The stool is the interior shelf at the bottom of the window. Its ends, called horns, extend past the casing. The apron is the trim under the stool.
Casing runs on all four sides and is mitered at every corner, with no stool. This is a clean, modern look and works well with flat stock.
The side casings run up to a built-up header made of a header stop, a header board and a header cap, the same way a door header is built. The bottom is finished with a stool and apron. This is the classic Craftsman window.
Jamb extensions
Windows are made in standard depths, but walls aren't all the same thickness. The window frame often stops short of the drywall.
Jamb extensions are strips added to the inside edge of the window frame so it comes out flush with the wall. That gives the casing a flat, solid surface to sit on, with an even reveal.
Crown molding
Crown molding covers the joint where the walls meet the ceiling. It's installed at an angle, called the spring angle, so it bridges the corner and leaves a hollow space behind it. Inside corners are usually coped and outside corners are mitered, so the profile carries around the room without gaps.
One piece of crown between the wall and the ceiling. It's the most common crown and works in most rooms.

Drawing: WindsorONE Classical Colonial dimensioned sheet
Four pieces, 7-15/16" tall and 8-1/4" out from the wall. Crown 2 hangs from the ceiling, a 1x6 soffit board runs from its bottom back to the wall, Crown 3 sits under the soffit against the wall, and Crown 1 is sprung from the face of Crown 2 up to the ceiling. Each layer adds a shadow line, so the cornice looks bigger and more formal.
No two cornices have to be the same. A built-up can be as simple as two pieces, like a crown over a picture molding, or as large as four to six pieces in a big or formal room. WindsorONE's collections show the range: Classical Craftsman (crown and picture molding) and Greek Revival (crown over a 1x2) are two pieces, Colonial Revival is three (crown, stop and picture molding), and Classical Colonial is four (shown above). Craftsman and Colonial Revival can also add a frieze board below for a taller cornice. Every added piece is cut, fit and installed separately, so the more layers a cornice has, the longer it takes and the more it costs.
Ready to start your project?
Price your trim room by room online. Final pricing is confirmed after an on-site measurement.